written by: Tiffanie Rashel
Hello craft Family. My name is Tiffanie Rashel from Rashel Made It LLC and I’m here to share with you all a tutorial on how to make a simple epoxy glitter tumbler using some awesome designs from LoveSVG. Since this is my first blog here, I should probably tell you about myself. Well, again my name is Tiffanie and I have been crafting for as long as I could remember. I specifically started epoxy tumblers within the last year. I’m kind of an impulsive “I can do that” person. So I purchased all the supplies I could find on Amazon or the local craft store after watching a bunch of YouTube videos and I started my journey. Needless to say, I absolutely hated the first cup I made. Not because it wasn’t “technically sound” but because there was no forethought in the design.
Which brings me to my new craft mantra “what’s the plan”. Before I start a project now I want to envision where it is going, but I understand that sometimes mid-project things can change and that’s ok too. So, let’s start this craft…. The items you will need for this project are:
- Supplies
- A stainless steel tumbler of your choice
- Choice of paint color
- Choice of glitter color
- Choice of 2 part epoxy
- Small measuring cups (with ml)
- Popsicle sticks
- 120 grit sandpaper sheet or block
- cup turner
- Paper plate (to catch drips)
- Paper towels for clean up
- Plastic gloves
The most important item is a plan that includes a design and about 3 days to complete all tasks. I will be using the unicorn mini SVG bundle to complete this project! I picked this bundle because I absolutely loved the designs and the variety of text included! When I looked at them all, I automatically got a vibe for a “Mommy and Me” piece so today we will make one of the two tumblers for this set. I decided I wanted to work on the kid cup of this Mommy and Me set first.
Let’s begin. To start this project I prepped my cup by sanding it with my 120 grit sanding block. You should be able to see the lines on it when they are done. I then washed it in dawn dish soap and dried it thoroughly with a paper towel. Now we base paint. This is a method of painting your cups in a white base layer so that the color you decide to use will really “pop”. After painting my cup white with a matte spray paint, I let it dry and went back on top of it with an awesome purple color. After letting it dry completely it is time to glitter 😍😍.
There are a ton of different methods to glittering an epoxy cup. Today I will be using a quick time saving hack. I use this when I want the base color of my cup to shine through but I still want some sparkle. So I will actually be mixing my glitter into my epoxy and coating the cup that way. So let’s mix our epoxy.
Before you consider working with epoxy please be sure to read the safety data card and abide by the safety precautions. For instance I am mixing my epoxy in my garage working space with the garage door ¾ of the way open to ensure I am in a well ventilated area, I will also be wearing plastic gloves.
To begin I will pour 20ml of part A into a small medicine cup. I will then pour 20 ml of part B into a separate medicine cup to ensure exact measurements and combine them. Once I have combined them I will stir this mixture until I no longer see a hazy fog or streaks of any kind in my resin. I stir slowly and scrape the sides of my cup to ensure a thorough mixture. Normally when I’m done I let my mixture sit for about 3 minutes to allow some of the air bubbles to rise and pop, however because I’m adding glitter to my mixture I will do that after this step. I will now add glitter into my cup and stir until I have a consistency of glitter I like. Now I let my mixture sit while I get my cup on my turner.
To get my cup ready to be epoxied I will place my spinner arm into my cup. The spinner arm is usually padded to allow for the cup to be secure around it or it is designed specifically for the size of the cup you are using. Once I have my cup secure on the arm I secure the arm to the turner and turn it on. I am right handed so I like my turner to spin clockwise while I am applying my epoxy. With the arm secure on the turner and the cup spinning clockwise I slowly pour my epoxy with my left hand and use my gloved right hand to spread the epoxy onto my cup. You can also do this with a silicone brush. I smooth the epoxy onto my cup ensuring to get every portion of the cup including the bottom. I do this carefully so as not to get any epoxy over the rim and into the cup. Once I am complete I will let my cup sit on the turner and spin for the next 6-8 hours. While this is spinning, let’s prep our images.

(The image on the left is the original SVG and the one on the right is the same image less the stars with an offset around the words)
I cut my unicorn svgs using my cricut maker. I decided to use vinyl instead of a water slide because I wanted to make sure my colors popped on top of these amazing colors. After uploading my svg into design space I sized my unicorn to fit my cup perfectly. I then took out the different color vinyls I would be using to layer my colors in this image. After laying everything out on my cutting mat I cut my image.
After letting my cup spin overnight I went to check on it to ensure it was level and there was full coverage on my coating of epoxy. My cup is now dry to the touch and ready to apply our decals. After cutting my decals using the original colors I thought I wanted to use, I didn’t like the way the colors looked on the background so I recut my images, reversing the colors. This is part of what we discussed in the beginning. Sometimes plans will change, and that’s ok.

To apply my vinyl I placed some transfer tape over the top and used my tool to smooth it on. I peeled up the image onto the transfer paper and placed the images onto my tumbler. When I was done with this part I felt like I was missing something so I went back to cut the stars I didn’t use earlier. Once all my images were in place on my tumbler, I placed my cup back on my spinner and mixed up a 15ml cup of epoxy (7.5ml part A and 7.5ml part B). I used this to layer over my cup and used my heat gun to pop any bubbles so my epoxy would be shiny and clear.
After allowing my cup to spin for 8 hours I checked how smooth it was and if I would need another layer of epoxy. My cup was extremely smooth so I didn’t add another layer. At this point I allowed my cup to hang dry for 48 hours to allow for a full cure using the brand of epoxy I was working with.
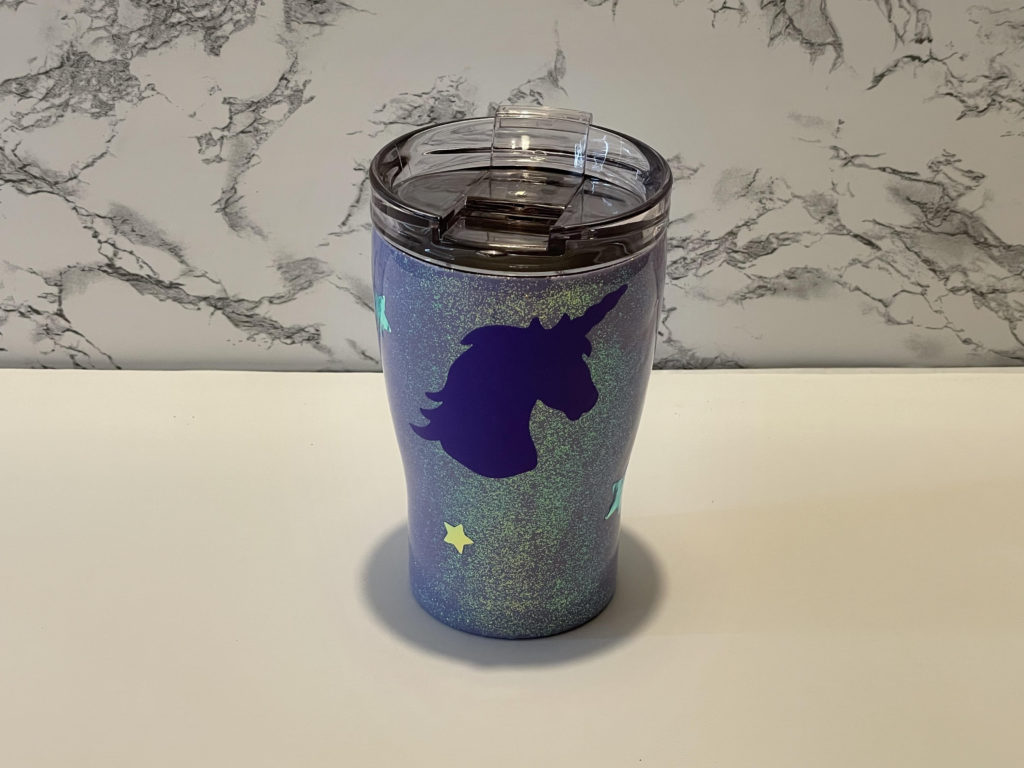
So I can imagine by now you’d like to see the completed project? Well here goes.. The mini of my Mama and Mini Unicorn Design. These designs can be further customized by adding names to the cups as well.


Well I truly hope you enjoyed our journey. If you do, besure to write a comment. Is there something you do when you work with epoxy that you’d like to share? Do you want to see a tutorial on another project? Let me know!! Anyway, I hope to hear from you all soon. Thanks for joining me today! Remember, things change and that’s ok. Now go Craft the day away!